Machine maintenance
A professional manufacturer specializing in the research, development, production and sales of UV printing equipment
Language
A professional manufacturer specializing in the research, development, production and sales of UV printing equipment
https://www.uv-printers.com/products-detail-34975
How to maintain the UV printer nozzle?
Roll to roll UV printers UV Printing machine Hyunvan Factory Suggest you should learn how to maintain the print heads of universal printers.
The first preparation is to replace the ink cartridge with the flatbed printer in the online state. When the print head of the universal printer moves to the middle of the track, the power can be unplugged. The purpose is to make the printer print the print head on the mobile trolley away from the nozzle. Protection and locking device to prepare for subsequent correct disassembly.
1. Disassemble the print head of the universal printer correctly.
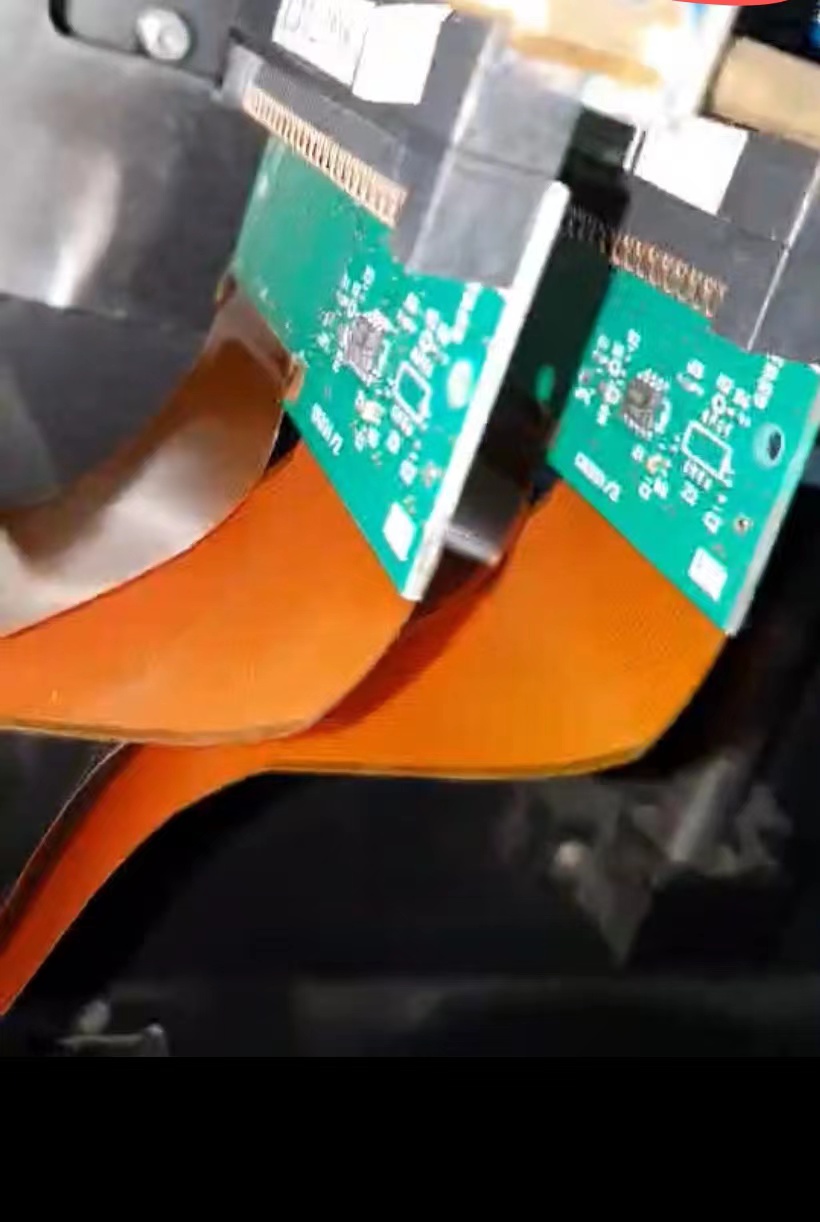
Step 1: Disassemble the print head part: After removing the top cover of the printer, carefully observe the right side of the print head of the universal printer (front to the machine), and you will find a clip. Use your left hand to gently grasp the front compartment of the print head , Use your right hand to pry the clip with a small screwdriver. At this time, you will feel the right side of the print head's front compartment move a little outward. Pull out the print head connection cable and cartridge monitoring chip cable (this cable needs to be clamped with a tool such as a hemostat) from the socket, and slowly pull out the print head connection cable from the circuit board slot. Under the white cable, you can see another clip on the left side of the print head. Use a small screwdriver to pry the clip slightly. At this time, you can separate the front compartment and the back compartment of the print head by hand, and the print head can also be removed from the track. Take it down. However, we also need to remove the traction rack from the motor gear on the right side of the car: use a small flat screwdriver to place it diagonally between the upper part of the gear and the rack, and move the rack to the right. The rack can be moved by the rotation of the gear. Take it off the gear!
Step 2: Disassemble the print head: After removing the print head, as long as you hold the front and rear compartments of the print head with both hands and apply force horizontally in the opposite direction, you can easily disassemble the print head.
2. Correctly clean the print head nozzles of universal printers
Preparations: The rear compartment where the print head nozzle of the universal printer is located also includes the nozzle drive circuit board, so it is necessary to protect the drive circuit board. Wrap the rear half of the compartment with the usual plastic wrap to prevent entry The water is scrapped.
The first step: soak the printer nozzle
Prepare a small flat pan container that can be filled with water, place the universal printer nozzle flat in the pan, and then pour the universal printer special cleaning fluid into the pan. The depth is based on the partial immersion of the nozzle. Be careful not to splash the cleaning fluid on the cable plug and the drive circuit board. The first soaking time is about one hour.
Step 2: Nozzle injection pressure flushing
Use a plastic tube of a disposable infusion set, one end is inserted into the syringe, and the other end is inserted into the ink inlet hole of the nozzle that needs to be flushed, and the cleaning hydraulic pressure in the syringe is inserted into the nozzle. Be careful not to pressure too much to prevent the water from being squeezed. The waterproof isolation glue inside the nozzle. This process needs to be repeated many times, until you see a thin water column ejected from each ink outlet. In this way, the clogged nozzle is cleaned and dredged.
3. The print head is correctly installed back to the universal printer
Step 1: First, tear off the plastic wrap, align the front and rear compartments of the universal printer nozzle horizontally, and combine them through the guide post and guide rail at the bottom, but do not fasten the clips on the left and right ends, otherwise it will not be installed. To the printer carriage track.
Step 2: Insert the cable of the ink cartridge monitoring IC into the socket, and then install the print head on the printer's car track. Use a small screwdriver to install the plastic rack on the gear of the carriage motor, but be careful not to damage the rack or gear. Pay attention to the relative position of the rack and the print head to avoid rework! After finishing this, push the nozzle compartment inward, and you will hear two sounds of "click and click", indicating that the nozzle has been installed in place. Push the nozzle left and right by hand to test whether it is installed in place.
Step 3: After completing the second step above, if the universal printer carriage moves freely, the printer recovery is complete. Then plug the other end of the drive cable back into the drive circuit board socket. If the print head cannot move freely, re-operate. After checking it is correct, carefully insert the print head cable back into the cable slot; finally, install the ink cartridge and power on and test the machine. And join the upper cover of the printer with the base, and glue the blue tape to restore the universal printer to its original shape.
The above is the correct disassembly and cleaning operation of the nozzle part of the universal printer introduced by HYUNVAN UV PRINTER. I hope it will be helpful to the majority of universal printer users.